Sunday, October 19, 2014

Come together!

Things came together today.


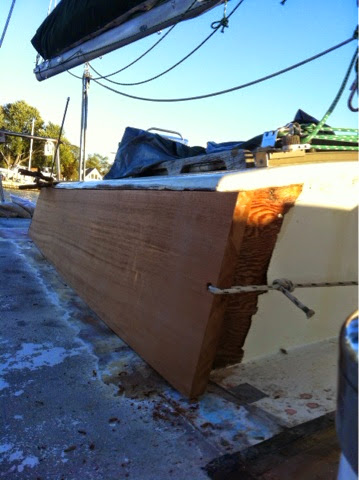
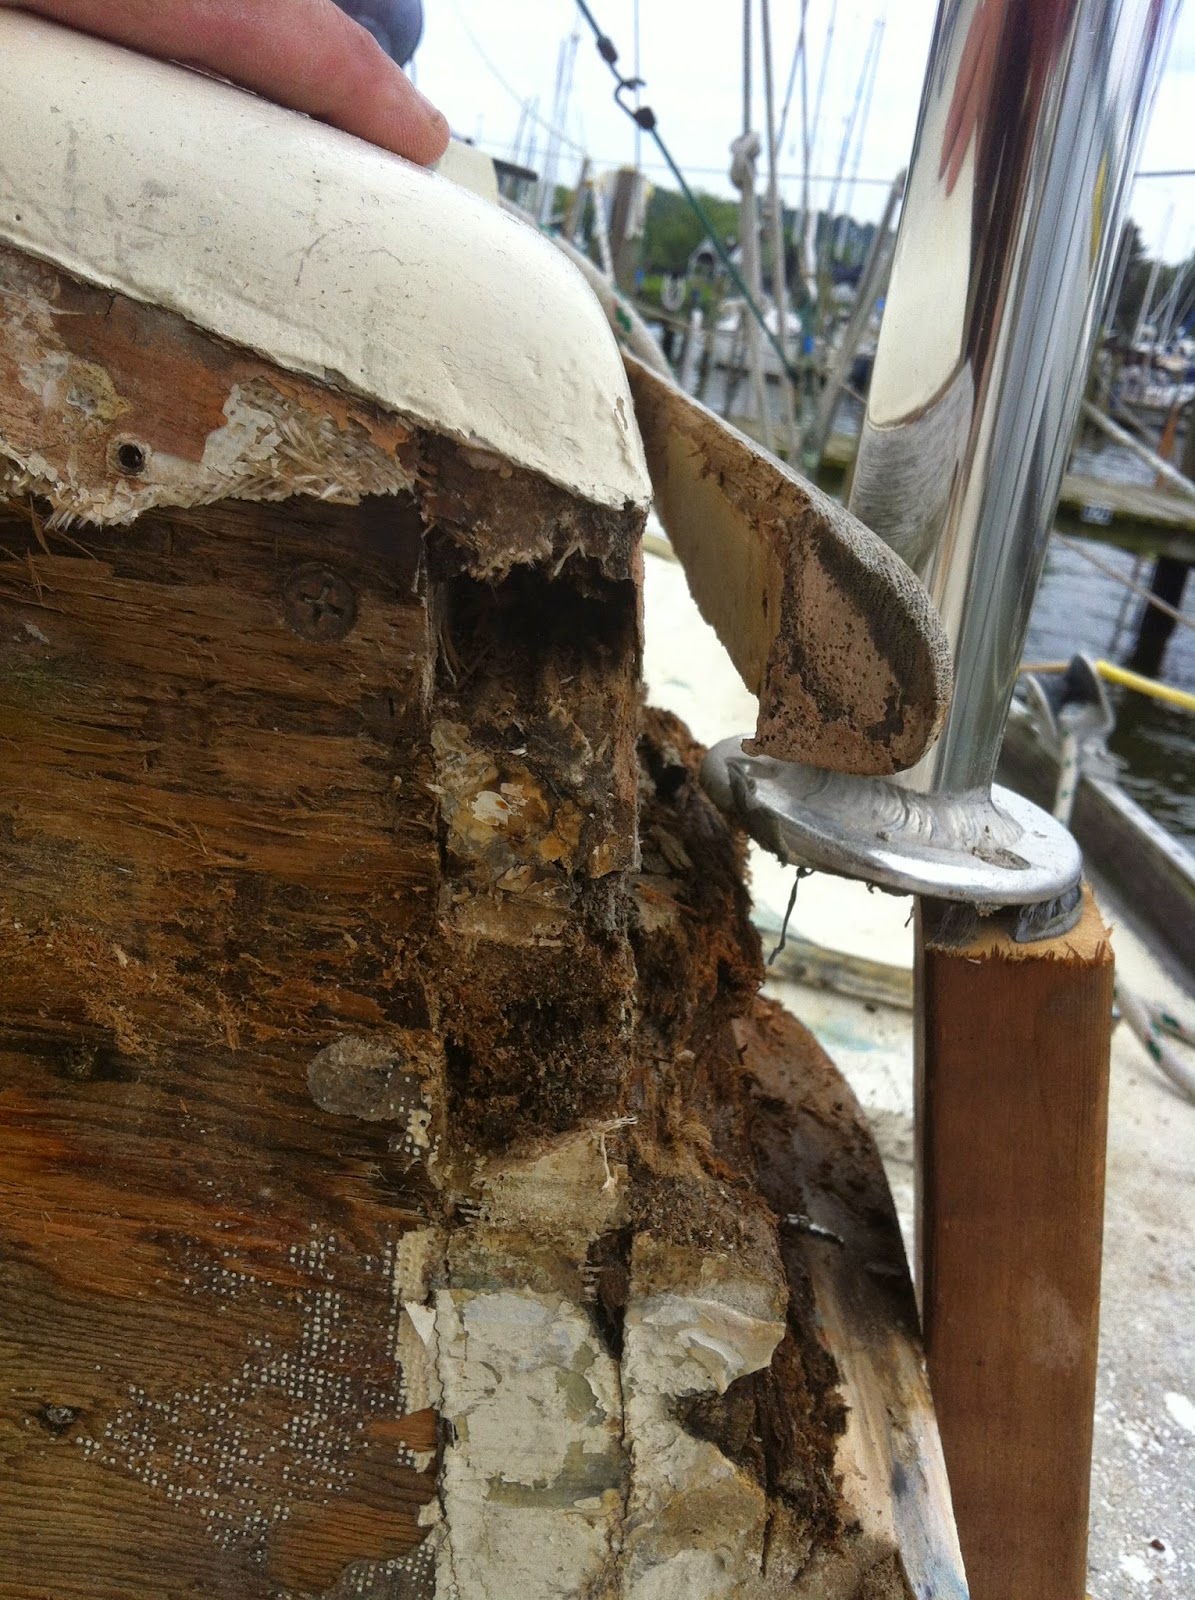
When I put the aft wall in I used a bunch of butyl. Well ...  It's hard to compress that stuff - and it gets harder with the cool weather. I wasn't happy with the fit - it was 1/8" proud and I tossed and turned at night over this. Today, I loosened everything on the aft board. I removed the aft wall to cornerspost screws, and loosened the pins. I used the multitool (ie Feinmaster - but Harbor Freight version) with a scraper and pulled most of the butyl out of the joints. This worked pretty good - the hear from the vibrating blade softened the butyl and it worked its way out. Then I tried to find a way to push the aft board in. I tried wedging a 2x4 - nope. I tried my hydraulic floor jack - it won't work on its side. Finally I got the 1-1/2" x 2-1/2"  x 7' piece of white oak that I had milled for deck beam sisters, and winched it home. Worked a charm. I again have a nice tight fit as when I dry fitted the pieces. I injected epoxy in the screw holes and sprayed the screws w PTFE lube and tightened down the port side. It's tight - what a relief. Then I hole sawed through the roof for the starboard side pins, and dry fitted the pins. Pretty happy about the fit - the picture above is the aft wall. the middle piece of the corner post and the side wall.. 

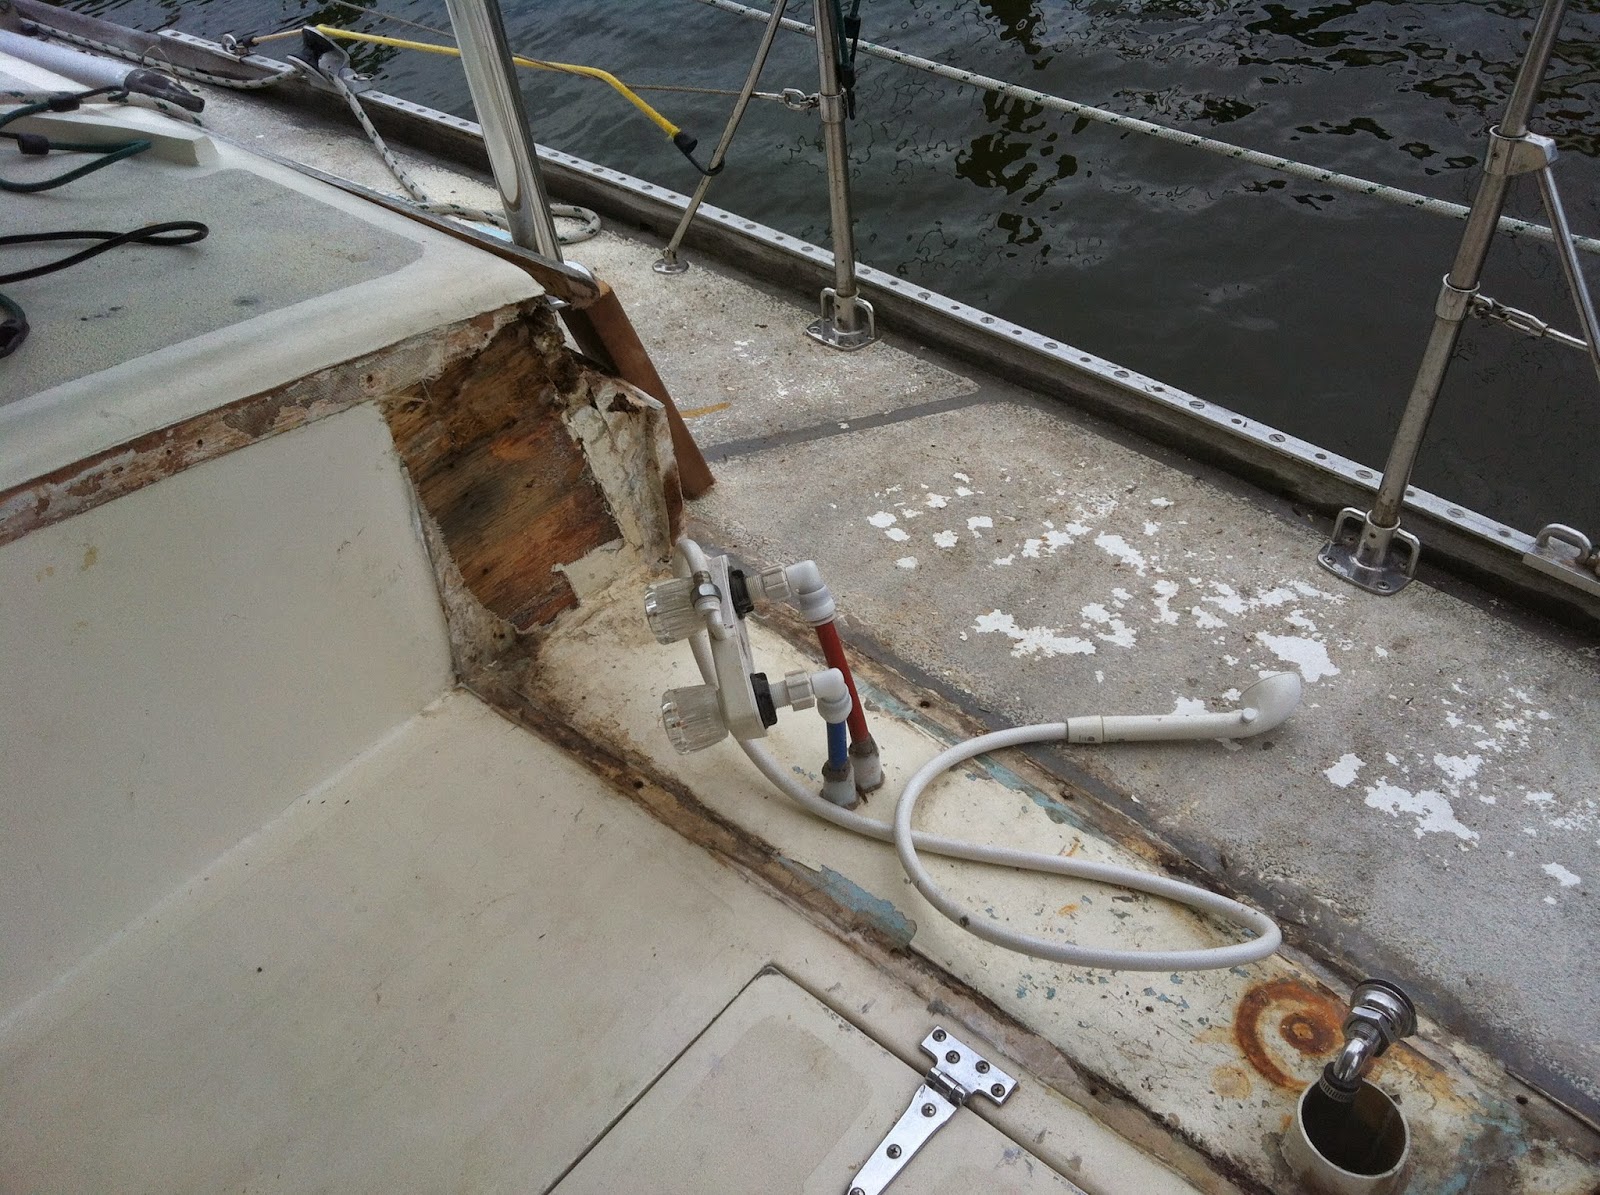
Here's a view from aft
Everything is in place and tightened to get used to their new home. 

All the lumber on top of the aft cabin is tomorrow's list. Make new corner post - 2 pieces - the interior piece is fine. (v3), the interior nailer board - all fitted, the mahogany dutchman for the starboard deck beam - cut v2 , the white oak deck beam sister - good, the starboard coaming box teak top - ready for finishing, the 11x1" mahogany board is for deck beam/backing plate patches at the Sampson post, the rest of this board will make up the fairing blocks for the coaming boxes - more on that later. 

So I'll be cutting lumber, cutting and drilling holes for portlights, treating all the new and old lumber with Smiths CPES, and working to finish these two walls   Its forceast to rain Tuesday - but a sunny week after. Still (barely) warm enough to do the epoxy and fiberglass work. 

Beautiful pink and blue sunset tonight. 


Saturday, October 18, 2014

Aft starboard side


Back at the boat. The starboard side fit right in. I left it 4" longer to attach a line and pull the board in with the winch. The aft most pin is in, and the board is bending around the bathroom bulkhead or wall. For the pins, I'm using 3/8" stainless steel threaded rod that runs through the cabin side board from top to bottom and then through the deck where washers and nuts fasten the side board to the deck. The original pins wee stainless steel carriage bolts. The pins are spaced every 18 inches, and there are also #12 x 2" bronze wood screws every 4".  


Tuesday, October 7, 2014

Aft cabin starboard side is out.

Mullet and I are back at the boat for a couple if days. The forecast was for showers today, but it held out till the sunset.

Today, I removed the starboard aft cabin wall. 


It came out with no problems, and was in surprisingly good shape. The previous owner had excavated about a foot from the forward end and covered it with a bit of Marinetex. The aft end had rot for a few inches from the corner post - but in between it looked great. Instead of repairing both ends, I'll replace text side. The roof looks good except for 9" of  the ack corner. I'll put a lap joint in and tie  it into the aft edge. The forward bulkhead also looks good except som deterioration in the first 2 inches. The forward corner post looks good - but it's fir - not mahogany! The deck looks good. I'll poke around a bit to see if I need to do anything with the front corner. 

The moisture meter readings were consistent with what I wad seeing. The new okume reads 11. The new mahogany reads 12. The teak coaming box top reads 10. All of the old fir ply reads'15, the old mahogany reads 12-15. I mapped out the readings as a baseline. The deck beam that I have been soaking in CPES read 12-15. Not bad! 

Got everything cleaned up and creamy forger new side, covered up with the tarp, and 10 minutes later it started raining. Nice thunderstorm now. 

I've got a few odds and ends to check out tomorrow, then we'll head home with the old starboard side and cut a new one and drill the rod holes. 


Friday, October 3, 2014

The roof clamp did a nice job - the lamination looks good, and the roof is very snug fit. I worked on the deck beam under the stbd cockpit bench - I cut out a space to add a dutchman and am soaking in CPES. Rain is forecast this evening and Saturday, so its time to head back to the house. Ill be back at it Monday.

New aft wall and laminated roof. 


And from the inside.


Deck beam between the aft cockpit bench and aft head. Rot removed to accept a dutchman patch. I'll soak it in CPES for a few days,


Packed up and heading home with the wonder cat Mullet. 

Thursday, October 2, 2014

Another beautiful day in Deale working on Toogoodoo.Lots of CPES, too much butyl, a tight fit and some laminating.

Laminating the roof patch - 4 layers of okume and a boatyard clamp.... Glad I kept the cut off edges from the aft wall and nailer - I used them as wedges under the 2x4 to shape the laminate.


CPES on everything! Roof pieces, Sampson post, aft cabin nailer
Butyl is great - but too much of a good thing.....Will have to tighten the screws over several days to squeeze all of this out....
CPES on the deck beams
Check out the new Sampson post - white oak and sapelle mahogany. 


Wednesday, October 1, 2014

Wonderful Wednesday

This morning started out overcast and drizzly, but finally dried out by 10:30 and turned into a beautiful day. 

I didn't get a lot done - but what I got gone felt good. The aft wall and the corner post are all fitted in. Looks good. 

Tomorrow I'll have a full day finishing the aft wall install, getting the roof patch on and shaped and everything glassed over. 


Tuesday, September 30, 2014

Sunshine!

It's a beautiful day in Deale! Sunshine and no rain. 

Today was CPES day. I laid out all of the pieces on a plastic sheet on the fore deck and a tarp on the aft cabin top and applied CPES to all of the new wood. I also treated the cut out areas at the deck around the aft starboard corner post, the aft edge of the aft cabin roof, and deck next to the Sampson post. For good measure I treated the port corner post and the open grain end of the bow sprit. 

At the end of the day I epoxied the deck repairs in place. Finally some construction!  Looking good. 


I saw that the marina had pulled a second derilect boat out and plopped it on the ground. Last week they hauled one out and cut it into dumpster size pieces over the next week. Looks like this one will suffer the same fate. Kinda sad. 


Yummy fried oyster po-boy and a sun downer at Happy Harbor. When I returned, Chris my next dock neighbor said that it was raining in Leesburg ....coming our way. 

Monday, September 29, 2014

Monday Monday

A full week of sunshine is forecast, Mullet and I packed up for a productive  week and headed to Deale. 

I planned to apply Smiths CPES penetrating epoxy to all of the old and new wood for the aft cabin, but it was drizzling on and off all day. 

I cut and fitted the plywood repair to the deck at the Sampson post and the plywood pieces for the aft edge of the aft cabin. Then I worked on the cockpit aft bench. I removed a section of the bench top 10" x 18", and found some rot underneath on the deck beam and bulkhead as well. Not what I wanted to find, but it looks pretty isolated. More excavation tomorrow. 


Dinner at Happy Harbor and an early night. Hope it's dry tomorrow!

Wednesday, September 24, 2014

Rain coming

Well - its going to rain this afternoon, so time to pack up and head back to the house. 
I have some supplies arriving - CPES will be here Friday, and we have some fun plans for the weekend. 

I taped plastic sheeting over the aft wall, and put tarps and sandbags over that.
  
I'll drove home with the 3 sheets of okume plywood on the roof - and will put a tarp over them when I get home. 

See ya next week.


Tuesday, September 23, 2014

Time to get some supplies

Today was shopping day - and tonight I want to call out some cool places and people in the Chesapeake area.

1st stop - Bacons ! No - not breakfast - a used marine things place. I really didn't need anything here - but needed to get in the shopping mood. A great place to find treasures for old boats and get a deal. I found another bronze cleat to match the one on the bow, a nice 16' hunter green nylon sail sausage bag, a light for the binnacle box, a #15 triangle sail needle and some waxed lined thread for the ditty bag, some bolts for the bowsprit. 

Next stop - Okume plywood from Chesapeake Light Craft . So glad to see this business thriving! Denise and I used to sail Windmill's with CLC founder John and his dad Dyer a decade ago. Such a cool place - there were a half dozen folks working on stitch and glue dinghys - very rewarding work. My dock neighbor Tim - Tartan 30 Wyndham - built his pram dinghy there - so cool. Tim stopped by Sunday - we talked woodwork - I told him about the NOVA labs maker space wood shop, he told me about the Washington Woodworkers Guild - fun stuff.

On to Fawcetts  for some West systems epoxy 105/205 and pumps, fiberglass cloth, 3M filler, Epiphanes gloss varnish, flares to replace the expiring ones. ll be back for silicone bronze wood screws,, bronze fitting replacement for the edson diaphram pump, that whale 3mm bilge pump, etc...  - actually this will be my goto place for all things marine. Really neat place - great inventory, great prices.

I really was hoping to find some Smiths CPES  - so swung by West Marine to check out their penetrating epoxy - nah - not what I want. I really dont like to shop here - their prices were 15% to to 20% higher on every item I had just bought at Fawcetts. 

And finally I stopped by a large sign shop - didnt get the name, but did get to chat up the folks about a source for MDO board - which I might use for the coaming boxes. I asked the guy why it stands up tpo the weather. He said it has no air voids - so doesn't delaminate. He pointed me to Harbor Sales  - on the Eastern shore in Sudleyville. I'll swing by on my next trip to Bohemia to help Rich with his Dickerson 36. 

No CPES - so I called. Talked to Steve Smith - nice dude - he said to call with any questions. He pointed me to rotdoctor.com, I called them on the ride home- 2 gallon kit will arrive Friday.

When I got to the boatyard it was already 5. I removed 2 more eyebrows, 4 more to go. I dont get it. The cocpit aft eyebrow had (2) #12 x 2" screws every 6 inches. AND they were set in 5200. The eyebrows are just ornamental - they have no other purpose - 6 or 8 screws would have held them just fine - there were 26. We are removing the eyebrows permanently. We love the look - but these suckers are the the cause of most of the rot issues. And the cockpit eyebrows just dig into your back - adios!

OK. more small items tomorrow while I wait a week for the Prestone to dry and the CPES to arrive.

Tuesday, September 9, 2014

Aft cabin aft wall and aft starboard corner posts being replaced.

Wall out - our new bay window....

 Corner post out.

Rot along the tongue and groove seam and the fasteners of the eyebrow. The port side was apparently repaired in the past - too bad all of the rot was not killed.


Tuesday, July 15, 2014

Forward cabin

Today I met our shipwright at Toogoodoo to begin work on the forward cabin repair. 

She got started right away, cutting into the plywood bulkhead and roof until she found rot free wood.


I understood that it is common to use a scarf joint to join the repairs.  An 8:1 ratio is generally considered adequate, a 12:1 is good. - 12:1 meaning that the scarf would be 12" long in a 1" thick board. 

A lap joint is a type of scarf joint - A joint made by placing one piece partly over another and bonding the overlapped portions. Something like this:


Our shipwright said she would apply a "ships lap" to repair the bulkhead, the roof and the starboard side.  The bullkhead is 3/4" grade AA marine fir plywood. She will cut out the bad area, then route out 1/2 the thickness in an area around the cutout. One layer of new plywood 3/8" thick will go in the hole, a second layer 3/8" thick will fit in the routed out area and be epoxied to the smaller piece, and to the routed out original piece. She routed a border of 4" - so effectively 4:1.  The roof is also plywood - actually 4 layers of 1/4 thick. The side is solid mahogany 1-1/4" thick and has 3/8" rods running inside its thickness. She will use a 1/2 board, and a 3/4" board routed out for the rod and lap these two boards together and to the routed out edge of the remaining side. This seems like a reasonable approach - the purpose of the scarf joint is to provide a large surface area to bond. The lap joint should accomplish this well.


..


On the roof, the area that has not been routed will be cut out leaving a hole, and a piece of 1/2" ply will be cut to fit the hole. 
A second piece of 1/2" ply will be cut to fit the routed out area, and
will be epoxied to the 1st piece, and to the routed area of the existing roof.


By the end of the day, the bulkhead and 1st layer of the roof repair was roughed in.                                                                                                                                                                 Tomorrow she will mill the mahogany corner posts, sides, and trim pieces at her shop, then we will meet again Thursday. 


I gotta tell ya - it was a bit scary. She works very fast - and appears to know her trade. There is a tradeoff between cost (time spent on the job) and quality.  I'm inexperienced so move slowly. Very slowly. My time is also free.... so I am willing to invest a bit more time into (trying) to do my best job. I worried about her fast approach - and when she ran out of epoxy today - she only came with 1 tube of Six-10, I worried a bit more. I also expected her to do something in the way of treating the remaining areas around the cut outs - ie penetrating epoxy on the deck beam at the bulkhead, or sealing the edges and end grain of cut pieces. She didnt. I mentioned it and she said the epoxy (six-10) would seal the cut edges.  The routing was sloppy - she said we would fill it with Marinetex putty. OK. So... we'll see how this repair goes before I commit to her for the rest of the work.


Wednesday, July 9, 2014

Fwd cabin repairs - prep

Time to start on the forward cabin repair - the starboard aft corner over the galley. Before the shipwright gets here, I'll do the destruction.

I'll remove the inside trim, the eyebrows, the coaming boxes, unbolt two of the bimini frame legs, remove fuel tank vent lines, cockpit shower plumbing, lazarette drains, and winch base fasteners to access the cabin corner.

June 38, 29, July 8, and 9th

The eyebrows were mounted with 2 ss screws every 6 inches - AND polysulphide..... ?!@#$%


Removing the inside trim using putty knives to minimize damage, and a chisel as a wedge to pry out the copper nails from the teak.


The coaming box will have to be removed to access the corner - and it needs to be replaced. Two legs from the bimini frame mount on top of the coaming box, so they will have to be unbolted and propped up.

Remove all of the teak bungs and the #12 x 1-1/2 bronze fasteners..


The cockpit and lazarette drains are an abomination. Multiple materials, sizes, reducers, and all 90 degree corners all add up to no drainage. Rip all of that out, and cut out the rotten gutters.


The coaming boards are fastened to these blocks which are fastened to the cabin bulkhead. Note the icepick. 


Cut out the inside board


The outside coaming board has been repaired with plywood...

And tah-dah - the caoming box is out!

And here's the corner of the aft cabin. ..... Looks like we'll have to patch the bulkhead and the starboard wall, maybe the roof a bit, replace the corner post and the nailer boards inside. The cabin wall is 1-1/4" mahogany, it looks like the fairing blocks are 2 more pieces laminated together and shaped. 

There are nice architectural fairing blocks on the fwd and aft corner of the outboard coaming board. Ours were so rotten its hard to tell whats what. Luckily, Eric and Jackie on D41 Compass Rose posted some nice picks of theirs when they repaired one of his cabin corners. They look like this.
Compass Rose fwd cabin aft port corner

Compass Rose aft cabin port fwd corner

Ok, ready for the shipwright on Tuesday.