Sunday, October 19, 2014

Come together!

Things came together today.


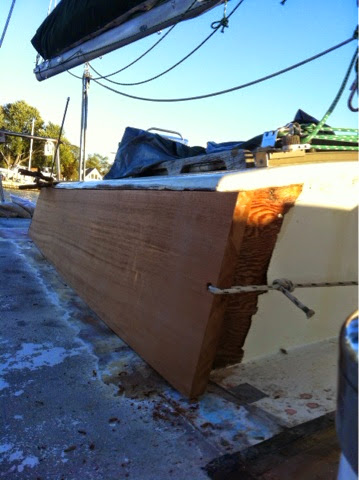
When I put the aft wall in I used a bunch of butyl. Well ...  It's hard to compress that stuff - and it gets harder with the cool weather. I wasn't happy with the fit - it was 1/8" proud and I tossed and turned at night over this. Today, I loosened everything on the aft board. I removed the aft wall to cornerspost screws, and loosened the pins. I used the multitool (ie Feinmaster - but Harbor Freight version) with a scraper and pulled most of the butyl out of the joints. This worked pretty good - the hear from the vibrating blade softened the butyl and it worked its way out. Then I tried to find a way to push the aft board in. I tried wedging a 2x4 - nope. I tried my hydraulic floor jack - it won't work on its side. Finally I got the 1-1/2" x 2-1/2"  x 7' piece of white oak that I had milled for deck beam sisters, and winched it home. Worked a charm. I again have a nice tight fit as when I dry fitted the pieces. I injected epoxy in the screw holes and sprayed the screws w PTFE lube and tightened down the port side. It's tight - what a relief. Then I hole sawed through the roof for the starboard side pins, and dry fitted the pins. Pretty happy about the fit - the picture above is the aft wall. the middle piece of the corner post and the side wall.. 

Here's a view from aft
Everything is in place and tightened to get used to their new home. 

All the lumber on top of the aft cabin is tomorrow's list. Make new corner post - 2 pieces - the interior piece is fine. (v3), the interior nailer board - all fitted, the mahogany dutchman for the starboard deck beam - cut v2 , the white oak deck beam sister - good, the starboard coaming box teak top - ready for finishing, the 11x1" mahogany board is for deck beam/backing plate patches at the Sampson post, the rest of this board will make up the fairing blocks for the coaming boxes - more on that later. 

So I'll be cutting lumber, cutting and drilling holes for portlights, treating all the new and old lumber with Smiths CPES, and working to finish these two walls   Its forceast to rain Tuesday - but a sunny week after. Still (barely) warm enough to do the epoxy and fiberglass work. 

Beautiful pink and blue sunset tonight. 


Saturday, October 18, 2014

Aft starboard side


Back at the boat. The starboard side fit right in. I left it 4" longer to attach a line and pull the board in with the winch. The aft most pin is in, and the board is bending around the bathroom bulkhead or wall. For the pins, I'm using 3/8" stainless steel threaded rod that runs through the cabin side board from top to bottom and then through the deck where washers and nuts fasten the side board to the deck. The original pins wee stainless steel carriage bolts. The pins are spaced every 18 inches, and there are also #12 x 2" bronze wood screws every 4".  


Tuesday, October 7, 2014

Aft cabin starboard side is out.

Mullet and I are back at the boat for a couple if days. The forecast was for showers today, but it held out till the sunset.

Today, I removed the starboard aft cabin wall. 


It came out with no problems, and was in surprisingly good shape. The previous owner had excavated about a foot from the forward end and covered it with a bit of Marinetex. The aft end had rot for a few inches from the corner post - but in between it looked great. Instead of repairing both ends, I'll replace text side. The roof looks good except for 9" of  the ack corner. I'll put a lap joint in and tie  it into the aft edge. The forward bulkhead also looks good except som deterioration in the first 2 inches. The forward corner post looks good - but it's fir - not mahogany! The deck looks good. I'll poke around a bit to see if I need to do anything with the front corner. 

The moisture meter readings were consistent with what I wad seeing. The new okume reads 11. The new mahogany reads 12. The teak coaming box top reads 10. All of the old fir ply reads'15, the old mahogany reads 12-15. I mapped out the readings as a baseline. The deck beam that I have been soaking in CPES read 12-15. Not bad! 

Got everything cleaned up and creamy forger new side, covered up with the tarp, and 10 minutes later it started raining. Nice thunderstorm now. 

I've got a few odds and ends to check out tomorrow, then we'll head home with the old starboard side and cut a new one and drill the rod holes. 


Friday, October 3, 2014

The roof clamp did a nice job - the lamination looks good, and the roof is very snug fit. I worked on the deck beam under the stbd cockpit bench - I cut out a space to add a dutchman and am soaking in CPES. Rain is forecast this evening and Saturday, so its time to head back to the house. Ill be back at it Monday.

New aft wall and laminated roof. 


And from the inside.


Deck beam between the aft cockpit bench and aft head. Rot removed to accept a dutchman patch. I'll soak it in CPES for a few days,


Packed up and heading home with the wonder cat Mullet. 

Thursday, October 2, 2014

Another beautiful day in Deale working on Toogoodoo.Lots of CPES, too much butyl, a tight fit and some laminating.

Laminating the roof patch - 4 layers of okume and a boatyard clamp.... Glad I kept the cut off edges from the aft wall and nailer - I used them as wedges under the 2x4 to shape the laminate.


CPES on everything! Roof pieces, Sampson post, aft cabin nailer
Butyl is great - but too much of a good thing.....Will have to tighten the screws over several days to squeeze all of this out....
CPES on the deck beams
Check out the new Sampson post - white oak and sapelle mahogany. 


Wednesday, October 1, 2014

Wonderful Wednesday

This morning started out overcast and drizzly, but finally dried out by 10:30 and turned into a beautiful day. 

I didn't get a lot done - but what I got gone felt good. The aft wall and the corner post are all fitted in. Looks good. 

Tomorrow I'll have a full day finishing the aft wall install, getting the roof patch on and shaped and everything glassed over.